Cách Phá Pass Excel, Gỡ Bỏ Mật Khẩu Của Sheet Trong Excel Thành Công 100%
Difficulty:IntermediateLength:MediumLanguages:url-selector#selectionChanged” data-controller=”url-selector”>EnglishEspañolBahasa IndonesiaМакедонски јазикPусскийукраїнська моваTiếng Việt
When it comes time to send your Excel spreadsheet, it”s important to protect the data that you”re sharing. You might want to share your data, but that doesn”t mean it should be changed by someone else.
Đang xem: Cách phá pass excel, gỡ bỏ mật khẩu của sheet trong excel
Spreadsheets often contain essential data that shouldn”t be modified or removed by the recipient. Luckily, Excel has built-in features to protect your spreadsheets.
In this tutorial, I”ll help you make sure that your Excel workbooks maintain data integrity. Here are three key techniques you”ll learn in this tutorial:
Password protect entire workbooks to prevent them from being opened by unauthorized users.Protect individual sheets and the workbook structure, to prevent the insertion or deletion of sheets in the workbook.Protect cells, to specifically allow or disallow changes to key cells or formulas in your Excel spreadsheets.
Even users with the best intentions may accidentally break an important or complex formula. The best thing to do is remove the option to change your spreadsheets altogether.
How to Protect Excel: Cells, Sheets, & Workbooks (Watch & Learn)
In the screencast below, you”ll see me work through several important types of protection in Excel. We”ll protect an entire workbook, a single spreadsheet, and more.
Want a step-by-step walkthrough? Check out my steps below to find out how to use these techniques. You”ll learn how to protect your workbook in Excel, as well as protecting individual worksheets, cells, and how to work with advanced settings.
We start with broader worksheet protections, then work down to narrower targeted protections you can apply in Excel. Let”s get started learning how to protect your spreadsheet data:
1. Password Protect an Excel Workbook File
Let”s start off by protecting an entire Excel file (or workbook) with a password to prevent others from opening it.
This is a breeze to do. While working in Excel, navigate to the File tab choose the Info tab. Click on the Protect Workbook dropdown option and choose Encrypt with Password.
As is the case with any password, choose a strong and secure combination of letters, numbers, and characters, bearing in mind that passwords are case-sensitive.

Browse to the File > Info tab, and choose Protect Workbook > Encrypt with password.
It”s important to note that Microsoft has really beefed up the seriousness of their password protection in Excel. In prior versions, there were easy workarounds to bypass password protection of Excel workbooks, but not in newer versions.

Set a complex password for security”s sake, but make sure to store it safely.
In Excel 2013 and beyond, the password implementation will prevent these traditional methods to bypass it. Make sure that you store your passwords carefully and safely or you risk permanently losing access to your crucial workbooks.
Excel Workbook – Mark as Final
If you want to be a bit less forceful with your spreadsheets, consider using the Mark as Final feature. When you mark an Excel file as the final version, it switches the file to read-only mode, and the user will have to re-enable editing.
To change a file to read-only mode, return to the File > Info button, and click on Protect Workbook again. Click on Mark as Final and confirm that you want to mark the document as a final version.

Mark a file as the final version to leave a gentle warning for users of that file.
Marking a file as the final version will add a soft warning to the top of the file. Anyone who opens the file after it has been marked as final will see a notice, warning them that the file is finalized.

When a file is marked as the final version, the workbook will show this
Marking a file as the final version is a less formal way of signaling that a file shouldn”t be changed further. The recipient still has the ability to click Edit Anyway and modify the spreadsheet. Marking a file as the final edition is more like a suggestion, but it”s a great approach if you trust the other file users.
2. Password Protect Your Excel Sheet Structure
Next up, let”s learn how to protect the structure of an Excel workbook. This option will ensure that no sheets are deleted, added, or re-arranged inside of the workbook.
If you want everyone to be able to access the workbook, but limit the changes they can make to a file, this is a great start. This protects the structure of the workbook, and limits how the user can change the sheets inside of it.
To turn on this protection, go to the Review tab on Excel”s ribbon and click on Protect Workbook.
Xem thêm: Tính Cách Người Tuổi Dinh Mao, 8 Điều Thú Vị Về Tuổi Đinh Mão 1987
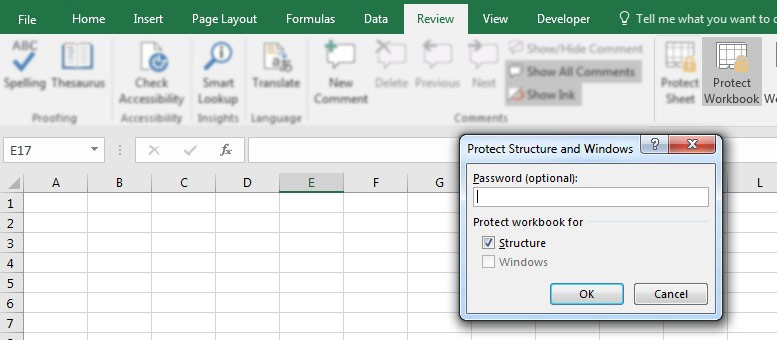
Find the Review tab, click on Protect Workbook, and set a password to protect the structure of your Excel workbook.
Once this option is turned on, the following will go into effect:
No new sheets can be added to the workbook.No sheets can be deleted from the workbook.Sheets can no longer be hidden or unhidden from the user”s view.The user can no longer drag and drop the sheet tabs to reorder them in the workbook.
Of course, trusted users can be given the password to unprotect the workbook and modify it. To unprotect a workbook, simply click on the Protect Workbook button again and input the password to unprotect the Excel workbook.
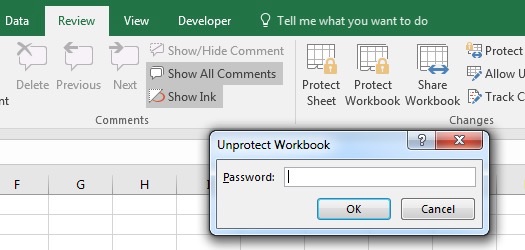
Click Protect Workbook a second time and input the password to re-enable workbook changes.
3. How to Protect Cells in Excel
Now, let”s get down to really detailed methods for protecting a spreadsheet. So far, we”ve been password protecting an entire workbook or the structure of an Excel file. In this section, we dig into how to protect your cells in Excel with specific settings you can apply. We cover how to allow or block certain types of changes to be made to parts of your spreadsheet.
To get started, find Excel”s Review tab, and click on Protect Sheet. On the pop-up window, you”ll see a huge set of options. This window allows you to fine-tune how you want to protect the cells in your Excel spreadsheet. For now, let”s leave the settings at their default.

To protect a sheet, select a tab in your Excel workbook, click on the Review tab and choose the Protect Sheet menu option.
This option allows for very specific protections of your spreadsheet. By default, the options will almost totally lock down the spreadsheet. Let”s add a password so that the sheet is protected. If you press OK at this point, let”s see what happens when you attempt to change a cell.
After a sheet has been protected, attempting to change a cell will yield this error message.
Excel throws off an error that the cell is protected, which is exactly what we wanted.
Basically, this option is crucial if you want to ensure that your spreadsheet isn”t changed by others who have access to the file. Using the protect sheet feature is a way that you can selectively protect the spreadsheet.
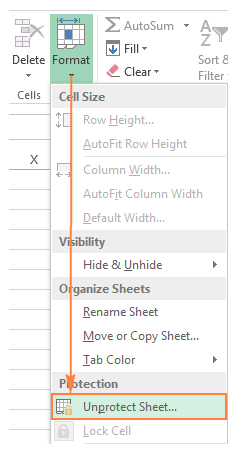
To unprotect the sheet, simply click on the Protect Sheet button and re-enter the password to remove the protections added to the sheet.
Specific Protections in Excel
Let”s take a second look at the options that show when you start to protect a sheet in Excel workbooks.

Password protect worksheet cells in Excel options.
The Protect Sheet menu lets you refine the options for sheet protection. Each of the boxes on this menu lets the user change slightly more inside of a protected worksheet.
To remove a protection, check the respective box in the list. For example, you could allow the spreadsheet user to Format cells by checking the corresponding box.
Here are two ideas on how you could selectively allow the user to change the spreadsheet:
Check the Format cells, columns, and rows boxes to let the user change the visual appearance of cells without modifying the original data.Insert columns and rows could be checked so that the user can add more data, while protecting the original cells.
The important box to leave checked is the Protect worksheet and contents of locked cells box. This protects the data inside of cells.
When you”re working with crucial financial data or formulas that will be used in making decisions, you have to maintain control of the data and ensure that it doesn”t change. Using these types of targeted protections is an important Excel skill to master.
Recap and Keep Learning More About Excel
Locking up a spreadsheet before you send it is crucial to protecting your valuable data and making sure that it”s not misused. The tips I shared in this tutorial help you maintain control of that data even after your Excel spreadsheet is forwarded and shared.
Xem thêm: Hỏi Về Việc Quy Định Diện Tích Xây Dựng Là Gì? Các Tiêu Chuẩn Tính Toán
All of these tips are additional tools and steps to becoming an advanced Excel user. Protecting your workbooks is a specific skill, but there are lots of ways to improve your performance. As always, there”s room to grow your Excel skills further. Here are some helpful Excel tutorials with important skills to master next:
How do you protect your important lingocard.vn data when sharing it? Let me know in the comments section if you use these protection tools or others I may not know about.
Có thể bạn quan tâm


Bài viết hay nhất
tiểu luận khởi nghiệp kinh doanh

tiểu luận quản trị nhân lực vinamilk
tiểu luận chiến lược marketing của th true milk
dàn ý đoạn văn nghị luận xã hội 200 chữ

tiểu luận về công ty vinamilk

cách lập phương trình đường cung và đường cầu

lí luận văn học về sự sáng tạo
tiểu luận về pepsi

tiểu luận vai trò và ảnh hưởng của ấn tượng ban đầu trong giao tiếp

Bài Văn Nghĩ Luận Về Trọng Nam Khinh Nữ ”, Một Vài Suy Nghĩ Về Sự Bất Bình Đẳng Giới
Dạng Bài Tập Đặt Ẩn Giải Hệ Phương Trình Của Hóa Học, Các Dạng Bài Tập Hóa Học 10

Công Thức Tính Diện Tích Tam Giác Vuông Cân Tại B, Diện Tích Tam Giác Được Tính Ra Sao
Cách Làm Tính Cấp Thiết Của Đề Tài, Hướng Dẫn Làm Đề Tài Nckh
tiểu luận dự án khởi nghiệp